Slightly Crunchy: In Defense of the Halfway Hippie

Decided not to cloth diaper or babywear? Feeling like you don't belong with the attachment parenting moms but you're not a conventional mother, either? This post defends the halfway hippie-- the mom who is slightly crunchy, but doesn't fall fully in either of the parenting camps!

I read a great article about Mayim Bialik (Blossom for you old-school folks, or the girl who played young Bette Midler in Beaches, or the girl who plays Sheldon’s girlfriend on The Big Bang Theory) the other day. It talked about how she is a strong advocate for Attachment Parenting (AP). She believes in extended nursing (her oldest is 3 1/2), she co-sleeps, she does elimination communication (meaning her children learn how to use a toilet before they learn to walk or talk, also known as diaper-less parenting). She wears her baby, unschools, and more. Her children are raised vegan and kosher. She’s an amazing woman doing a lot of amazing things with her children.

As a parent, I’ve chosen to do a lot of seemingly “crunchy” or “hippie” things myself. I made all of Zach’s baby food myself. We co-sleep. I homeschool. I’ve done some babywearing (though I don’t wear him all the time like many AP moms). I try to keep his goods organic when I can.

But the thing is, I get mistaken for a full-crunch Mayim Bialik mom all the time. And, as much as I admire her parenting style in many ways, I’m not her.

I’ve had several people hear that I homeschool and make Zach’s baby food, only for them to ask me my advice and suggestions on cloth diapering. Oh honey child, I do not cloth diaper. I think it’s great that so many moms do, but I don’t. We are disposables all the way!

I feel like too many times people hear that a mom is doing one or two things that are associated with the attachment parenting or organic/crunchy lifestyle, and assume that she is an all-or-nothing hippie mom. I’ve found that, more often than not, this isn’t the case. I’ve heard of a lot of cloth diapering organic moms that don’t raise vegan babies. I’ve heard of many moms that co-sleep and baby-wear, but feed their children Gerber and Beech Nut. I’ve seen moms who do extended nursing and baby-led weaning, but don’t co-sleep or cloth diaper. I feel like there is so much pressure as a mom, if you choose to do a few attachment parenting behaviors or granola mom behaviors, to do it all. I was having a conversation with some ladies the other day about diapers. One of them said “Oh my gosh. My friend’s baby had the WORST blowout when we were out to lunch. You know, if she was smart, she would make the switch to cloth diapers. I’ve never seen a blowout on a cloth baby.” I immediately blushed and felt ashamed that I had the audacity to put my child in a disposable diaper. Then, I started to feel ashamed that I felt ashamed of a parenting choice I had made! Who cares if the other women around me have made that choice for their children, one that fits into their lifestyle but not into mine? That’s great, but it’s not me.

I realized that, so many times, I felt ashamed about little things I did. I made all of Zach’s purees and many of his snacks like sweet potato fries, but sometimes I’d be lazy and give him a rice cake or a handful of SuperPuffs instead, which aren’t homemade. I feared that people would see me as a hypocrite if I went halfway.

I felt ashamed that sometimes I made choices that were right for my family. When some friends found out that I chose to co-sleep, I started getting bombarded with articles about how dangerous it is, and photos of babies sleeping with butcher knives. It took me a long time to stop feeling guilt about the fact that co-sleeping was the best choice for my family, and to realize that we co-sleep in an incredibly safe manner (and most co-sleeping deaths come from families who are uneducated about the safest co-sleeping practices).

I realized that I had spent a great deal of time feeling guilt about my parenting decisions rather than just enjoying my life as a parent. And then I realized that my words sometimes to other parents may have been causing them to feel guilt about their choices, whether or not it was intentional.

The truth is, not all of us who embrace an AP lifestyle are going to be a Mayim Bialik. There are going to be those of us who slip through the cracks, who embrace a half-hippie lifestyle. Maybe you’re a cloth diapering homemade baby food mom who balks at the idea of co-sleeping and babywearing. Maybe you chose not to breastfeed but you still love to co-sleep and wear your baby. All of us have to find what works for us as parents. It’s not going to look the same for everyone, and none of us should have to feel like we’re being put into some sort of box for it.

So this is it. I’m embracing the half-hippie lifestyle. I’m proud to be only slightly crunchy, to be organic when I can and embrace the times when I can’t be that person, too. My son’s going to eat meat sometimes. He’s going to wear disposable diapers and he’s going to get store-bought snacks occasionally. But he’s also going to choose when he stops breastfeeding, he’s going to eat a lot of homemade foods, and he’s going to co-sleep with me for quite awhile longer.

Do what’s right for you and your kids. Don’t feel ashamed about it, like you aren’t eco enough or aren’t traditional enough… there will always be advice coming from all sides, and always be some form of judgement on all sides… but you have to make the decisions that are best for you, best for your child and your home and your lifestyle and your family.

When you’re doing what you truly feel is best for your child, I’ve found that the guilt and shame often tends to melt away.

My Road to a 5k

Several years ago, when I was a teen, bright-eyed and much more optimistic, my doctor sat me down for a talk after my 3rd or 4th knee surgery. He told me that the chances of my knees getting any better were slim to none, and that it was likely, over time, that my knees would get much worse.

He said that, as I got older, I would likely begin to lose the ability to walk much. As a competitive dancer, this was the worst thing that I could hear.

Fast forward 5 years and several more surgeries. My condition is a daily part of life. It hurts me literally every single day. But I can still walk. And, my doctor has encouraged me to lose some weight. My condition, he said, is now starting to be exacerbated by my weight… and, while walking can hurt my knees, if it’s a way to get the weight down, it may be my best option.

There’s just one thing.

I really. really. REALLY. hate walking.

It’s not fun. I mean, who wants to just… walk for three miles? But, when I found out about The Color Run, I knew I had found my motivational ticket. You see, the Color Run combines everything I actually LIKE about walking (spending time with friends and family, getting to have a fun conversation, bright colors) with my dreams I have yet to accomplish (actually getting off my butt and losing some weight, small and manageable goals, finding a reason to fight through the pain of walking to actually walk, and attending Holi in India, where colored powder is thrown in celebration of Color).

If you aren’t familiar with the Color Run, it’s a new craze sweeping the nation. Essentially, you register for this race, and, the day of the race, you get all prepped up at the starting run in a white tee shirt (colorful, I know). At the end of the first kilometer, a team of volunteers tosses yellow powder at you. At the end of the second kilometer, you get green powder thrown, etc). By the end of the 5k, you are a total colorful mess, covered in 5 different colors… and BAM! Color party! Woooo! Everyone starts throwing their colors up in the air together as a celebration of color and completing the race.

Am I not explaining it well? That’s okay… this video from one of their other races may be of assistance!
[youtube=http://www.youtube.com/watch?v=iSltbsNcZus]

See? Doesn’t that look like a blast?

I thought so, too, which is why, when the Color Run sold out before I got paid, and I missed out on registering for Kansas City, I was devastated. Yes, I literally spent my morning crying over the fact that I couldn’t participate. Then, the next day, I got an email saying that because Kansas City sold out in record time, they’d be opening a second date for a second Kansas City event! And that means I’m able to participate! That second date TOTALLY made my day!

I’m so excited to be walking (yes, walking! Not running!) with my brother, my dad, and one other super special person who I’m SO excited will be joining me… you see, years ago, when my brother was only 3, we picked up a complete stranger from the airport named Carolin… and to this day, I am proud to call her my sister, Carolin (more about hosting foreign exchange students in another post!) My sister, Carolin, is flying back in from Germany to come visit us again, because, as a permanent part of our family, we just can’t get enough of her!

We’ll be going through the Color Run together. But this means one thing… I have until July 1st to go from walking enough to get around my house, to walking enough to get around a city! (Cue training montage). The nice thing about this blog is that it’s going to keep me accountable… I’m hoping to update you guys as I train, and get one step closer to reaching my goals!

Zach’s Room Re-do

A few months ago, I was browsing pinterest and saw an over-the-top inspiring pin. I stopped everything I was doing, and ran in to show my mother the image that had caught my eye.

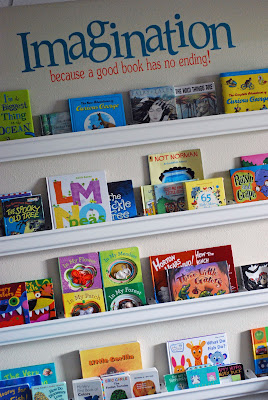
It was a very simple, very chic bookshelf. It was visual, it was bold, and it allowed children to see the covers of books. It was the perfect shelf for Zach’s room, and I knew I had to have it. But when I started telling people about my idea, everyone kept saying “you want to do WHAT exactly?”

I wanted to put a set of rain gutters in Zach’s room. As a bookshelf. You read that right.

My initial inspiration came from the beautiful photographs from Sweet Cheeks Tasty Treats (linked in image below):

And from reading her article, her inspiration came from the fabulous blog, Raising Olives (also linked below). Raising Olives had an amazing step-by-step tutorial that I wish I would have read before the project, but alas, we figured it out based on the original inspiration photograph alone.

If you look at Zach’s room before, you’ll see the trouble that we’re dealing with. He has a small room, with the door to both the hallway and the closet on the same wall, a window opposite those, and, as I already mentioned very little space.

In this picture, you’ll see that we have all of the books piled up in the corner in a box. Any time Zach and I would go to read a book, we would face two problems.

  1. We could only read the books on top. If we tried to dig deeper for the other books, the whole stack would topple and books would be everywhere.
  2. We couldn’t even see what books he had- everything was a mish-mashing of books and you couldn’t see titles, covers, or anything.

I considered bookshelf options, but bookshelves have a large footprint, which doesn’t work for a small room, plus kids often end up pulling a bookshelf down on themselves trying to get a book… and I didn’t want that to happen. I also considered creative bookshelf ideas, like putting the books in a little red wagon, but that again took up a lot of space… and have you seen little red wagons these days? They’re not the cute metal ones of my childhood, nor are they in my price range.

I had a total of about $50 to spend on the project… and that meant getting a new piece of furniture (the blue couch was way too big for that room) and the rain guttering. I had a few thoughts going into it:

  1. I wanted to spend as little as possible, but still make a big change… there was no room for Zach to play or for us to read together.
  2. I wanted that blue couch out of there. It became a catch-all for laundry that I didn’t want to put away, and didn’t really allow for us to spend much time in there.
  3. I wanted his room to be useable. I imagined days where we could go in there, turn on Sesame Street, and play in the floor, or curl up with a good book in a big cushy chair.
  4. I wanted to re-coup as much of my costs as I could.
  5. I wanted to be able to do the whole change, as well as re-organizing his room and closet, in a weekend.

Our process started when an amazing couple from church decided to get rid of a chair… it was the perfect choice, a cushy brown leather recliner, perfect for Zach and I to curl up in together and read. They were so nice and giving that they just gave it to me! The chair was perfect, but the chair being free? Even better. Their generosity was just amazing… and it’s really what helped my room come together.

If you’re wanting to design on a dime and don’t have someone who will give you a perfect chair out of the kindness of their hearts, you do still have a few options on how to get one.

  1. Try Freecycle. A lot of people will give away furniture that is in excellent condition- all they require is for you to pick it up. One time I was able to score a huge red rug for my dorm room, completely free, because the original owners just wanted it out of their storage area.
  2. Check garage sales. That’s another source of excellent cheap furniture (and it’s how I got a lot of my furniture for college).
  3. Ask your friends and family to keep an ear out for one- the more people who are looking, the more likely you are to find what you’re looking for!
  4. Join a local group on facebook. For my hometown, we have a facebook page for women who are 21+ where we can recommend local businesses, sell items we no longer need, and chat about upcoming social events and functions. That has become an excellent resource for getting things at a good discount (especially when it’s not garage sale season!) Church groups and mommy groups on facebook can also be really good resources.
  5. If all else fails, check Goodwill/Savers/Salvation Army/etc. They often have used furniture at reasonable prices. Make sure you sniff it- if you’re a smoke-free home and it wasn’t in one before, you’ll be able to tell.

I had already gotten the perfect chair, and since it was a gift, my budget of $50 remained intact. You’d be amazed at what a little re-arranging can do! We moved the blue couch out (right now it’s in the sunroom of our house, which tends to be our family gathering room), and moved the chair in.

Because Zach’s room had a fresh paint job before he was born, we really did not need to repaint it. His other furniture was also staying the same- his bed was staying, and so was his changing table (before he was born, I updated it with spray paint from a brown wood that didn’t match our bed, to a bright orange that went with the bedding inside. Perfect!) His dresser would remain inside the closet. All of that was constant. We decided that an easy way to make more space was to move everything. We switched moved the changing table and bed to the other side of the room, and put the chair near the closet (we did make sure that the closet could still be opened, and that the recliner could go all the way back in a reclining position). I also put a hamper next to his changing table- I had found the hamper downstairs in our storage area, and thought it was much better than his clothing just tossed in a pile in front of the changing table. His second car seat unfortunately has to sit out in the open- there’s just no other place to put it.

Finally, it was time to start on the actual bookshelves, which would be the new focal point of the room, so we made the trek to Home Depot. We headed to the back of the store (yes, they keep guttering in the back corner at the locations near us, and it seemed like the walk took forever… especially if you walk it holding guttering on the way back). We looked and looked, and they had the guttering, but no endcaps (they were sold out). So, the next day we made the journey to the Home Depot on the other side of town. We got our gutters, and we got our endcaps.

Because for projects like this, my mother and I are a little bit clueless, we asked Home Depot if they could cut the 10′ long bookshelves down to 5′, which fit our room better. They took us over to the electric department and cut them to our size- perfect!

I do want to note here that I chose vinyl bookshelves because the edges aren’t as sharp, so if Zach got wild and crazy, we’d be covered.

We brought them home and got to work. Dad started by gathering the items we already had- like leftover screws from the deck, with washers that would anchor the bookshelves in tighter, in case Zach did try to climb or pull on them. Then, dad found the studs in the wall (I’m not quite sure how… I’ve been looking for studs for years and haven’t had much luck! Sorry… girl humor…) which made excellent anchor points. Anchoring into studs works best because they are the firmest points- if you put it in to sheetrock alone, they could be pulled off a lot more easily. Dad chose to anchor each shelf into three studs- one on each end and a stud near the middle.

We measured Zach’s largest book as a jumping off point of how far apart we wanted each shelf. Zach’s tallest books were a foot tall, which means we’d want about 12″ from the top of one bookshelf to the bottom of another to make sure that his books could be easily snagged out of there.

After all of the measuring, stud-finding, screwing, and cleanup… the shelving was done. I decided to accent Zach’s room with some decals I had left over from the other side of the room, which I had received as a gift at my baby shower. I love how the project turned out.

(I did tack the cords back that are by the changing table- I accidentally took the photo BEFORE I had done that. Additionally, we’ve hung the picture on the changing table on the wall by the window, so it’s up, too… that’s what I get for taking my After’s before it’s truly “After”).

I also decided to work on Zach’s closet during the renovation… I did not snap a before picture, but I did shoot a few after shots.

I have to tell you a few things about me in terms of his closet… first, you’ll find a lot of diapers in various sizes. I have diapers all the way up to size 5 (he’s in a size 3 now). I tend to buy diapers when they are on a really good sale at Target (and combine them with gift card deals). When Target has diapers on sale, and has a deal where you buy a certain amount of diapers and get a gift card free, I tend to take them up on that… but when I get plenty in his current size, I start buying a size up. I save the gift cards for any time we’re in a real budget pinch, which I HAVE to get something, but simply don’t have the money in the budget right then (or for when our Target budget has to be spent on an unexpected emergency, like a car repair). I also pre-buy diapers for several reasons. For one, there has been an instance where he outgrew what I had on hand, and I had to rush to the store to buy the next size up. Because I now have diapers in a couple sizes up, if he outgrows one, I’m able to move up to the next size, knowing I have it on hand.

I also pre-buy toys sometimes. Whenever I find a really good sale on something that would make a great gift, either for him or someone else, I tend to purchase it. For example, Melissa and Doug wooden toys that range $20-$30, I’ve purchased at around $6 each. When something is on an amazing sale, I go ahead and get it, and stash it at the top of my closet. It means that I’ve had to do zero shopping lately. Additionally, when he gets books that he isn’t quite ready for (as in, paper books he would tear now, etc) from our parenting groups or organizations, or when I spot them on a super sale (literally pennies), I stash those in bags at the top of the closet, too, for inclusion in gifts later on. Pre-buying means that even if I don’t have the budget later, I still have something. If his birthday month gets really budget-tight for me, at least I already have his birthday gift planned out (and purchased when I have the money).

You’ll also notice conventional baby food, even though I make mine homemade. I do like to keep a few jars on hand in case there is some sort of emergency, like with the electricity, where the food I have homemade for him isn’t an option. You’ll also notice his favorite snacks- organic puffs from HappyBabyFood and Plum Organics, and some cereals.

But back to my final note about the bookshelves. At the top of his closet, you’ll see boxes. Some of them contain clothing he doesn’t quite fit in at the moment, but that middle box, the brown one, it contains books. I decided when making this bookshelf that I would have a set plan.

You see, the top shelf contains all of our “Classic Favorites.” It has a book that grandma recorded for him, a book that grandpa recorded for him, and the book that everyone who attended my shower for him signed (in lieu of a guestbook, we had them sign a story book). Additionally, it contains Jeffrey’s favorite book as a child, and a selection of my favorite books as a child. These are books that have been passed down from us (and some of them from me to Jeffrey to Zach) that are true treasures in our family.

The second shelf right now has a selection of Sesame Street books and a selection of books about the bond between a mother and child. The second shelf is probably going to stay put for now, but as his interests change, the Sesame Street books may change to something else, as well, and as he grows up, we have plenty of Sesame Street books that will join the fold.

The third shelf is our theme shelf… this selection will change regularly, based on the seasons, or the holidays, or a certain theme relevant to our lives (for instance, going to the dentist, growing a tooth, or losing a tooth could lead to us having some tooth related books there, and at Valentine’s Day, we’ll probably have V-Day themed books). This theme could even be completely unrelated to the season or holiday or life theme, but could just be a fun category (for example, dinosaurs).

Today is Dr. Seuss’s birthday, so our first themed set of books is our collection of Dr. Seuss classics. Many of these are treasured copies of books (The Foot Book is the first book I learned how to read as a child), and these all relate to the central theme… Seuss!

The lowest shelf will be the shelf Zach is able to reach first, which is why it contains a selection of his favorite books. These books are books that are safe for him to have (right now he’s in a book-chewing phase) and are books that, when given a choice, he tends to select for himself (You are My Cupcake and Spot Goes to the Library are his personal favorites at the moment).

The gutters and endcaps cost me a total of $40.57. I was able to recoup a lot of this cost by selling items Zach no longer needed. That means that my room re-do literally cost me less than $10. It truly is a design on a dime moment. When your kids see a new room re-do they love, and you need the budget for it, try asking them to go through and decide what they are willing to part with in order for the design to be more affordable.

In the end, our room design met my requirements- it added space, it didn’t cost me a lot after I recovered the costs from selling things we no longer needed, and it took less than a weekend to complete. The bookshelves don’t take up more than a few inches out of the wall, which is perfect for our room. Now, Zach and I are able to get enjoyment out of our room, and we spend a lot more time back there than we ever did before.

He is able to see the book covers so he can find his favorites any time he wants them. As he grows, it will be much easier for him to select books to read and get them on and off of the shelf himself (how many times have you gone to a bookshelf, tried to pull one book, and pulled out several because they all shift and fall?) and he won’t accidentally pull the whole shelf down on top of him.

It truly is a great room design for us.

Have you tried a unique and innovative room solution? Door for a headboard? Bookshelves out of a found object? Picture frames made from an old window? How have you used something for a new purpose in your (or your child’s) room design? I’d love to see you link it up in the comments! I’m always looking for new inspiration!

What I’ve Learned from Being Single

I've learned a lot on my journey of singlehood... From the girl who used to HAVE to have a boyfriend, now I've been single for quite some time, and there's a reason (and a lot of things I've learned from it!)

I have been single for almost a year now. It’s amazing to think that it’s been that long, because I used to be the girl who couldn’t go very long without being with someone, even if that someone was the wrong person for me. I’ve been in many bad relationships… relationships that pulled me away from family, relationships that tugged me away from faith, and relationships that tested my very strength. I’ve been hit, I’ve been verbally kicked in the gut, and I’ve been hurt. But I’ve also been mean, I’ve screamed, and I’ve said things I shouldn’t say.

Being single for almost a year has, in many ways, been trying. I can’t remember a time since I was about 13 that I didn’t have a boyfriend… or, rather, I can remember short periods, but nothing longer than a few months. A year-long dry spell? That’s a big deal.

I’ve learned a lot from being single, though. I’ve learned a lot about myself, a lot about other people, and a lot about what I’m looking for when that amazing man finally does come along. Here’s a little about what I’ve learned.

  1. My values are important, and they’re valid. I shouldn’t toss my thoughts, my values, and my dreams aside because someone discounts them. My dreams and values are just as valid as my partner’s. If he can’t accept that, or if he holds values that directly compromise or contradict mine, he isn’t the right guy for me.
  2. My family is more important than any relationship. My son, my parents, my brother… they’re the ones who have been there in the wake of breakups and makeups. They’re the ones who have stayed consistent, even when I’ve pushed them away for a relationship. That’s important.
  3. I don’t have to have a man to feel important. This is a big one for me. In the past, I’ve always felt like I needed someone, a partner, to feel valid. I don’t need that. My God is my first big relationship that validates who I am, outside of any romantic connections. My family validates me, my career as a blogger validates me. My faith in God, and my own successes, dreams, and thoughts, are what validate me as a person… not a guy.
  4. When I do eventually find the right guy for me, it will enhance my other relationships, rather than detracting from them. The right guy isn’t going to trash my family or my faith. He’s going to say “you know what? Those things are very important.” and he’s going to be okay with a) spending time with them, and b) understanding when I want to spend time with them occasionally instead of with him. I can’t count the number of holidays that I have spent running over to boyfriends’ houses or something, instead of spending it with my family. My very last Thanksgiving with my aunt before she passed, was a Thanksgiving dinner I left early to see a movie with my boyfriend. Wow. Just… wow. That’s not to say that spending time with him won’t be frequent, or awesome, but I believe the right man will understand that my family is a huge part of my life… and it isn’t all about him.

That’s not to say my journey as a single woman hasn’t been hard. There are definitely many times when I wish I had someone to turn to. I definitely have my concerns that I won’t find the right father figure for Zach when it comes time for those important things where he needs a dad. He has an amazing uncle, and an amazing grandfather, but a father figure is invaluable. I also wonder, “will I always be living with my parents, single?” And then I realize all of the awesome things involved in living with my family, and the great times that we have.

Being single is hard. I spend a lot of time in prayer, both hoping that a man will eventually join me on my journey through life… but I also spend a lot of time thanking God for the people who are in my life… my very cool best friend who I don’t see enough, but always seems to balance me. My mom, who is my rock. She’s the one I go to every time I need to bounce an idea off of her, the first person who suggested I consider blogging as a full-time gig, and the one who has supported me from day one. My awesome dad, who CHOSE to be my dad (he legally adopted me when I was nine). My brother, who has been a great influence and role model for Zach so far… all of these people are important.

The most important thing that I’ve learned from being single is this.

Relationships and significant others are more than just boyfriends/fiances/husbands. Relationships… significant others… those are the SIGNIFICANT people in your life. I don’t have one significant other. I have a lot of significant others. God. My son. My mom. My dad. My brother. My family around the world. My best friend. These are the significant people in my life, and they have nothing to do with a boyfriend-girlfriend-husband-wife situation.

It’s okay to be single. My time being single has brought me closer to family and to God… that, to me, is more important than any relationship with a guy.

A Review of Citrus Lane’s February Box: Play To Learn

I know, I know, I’m way later than usual in posting this. For being a short month, it’s been a REALLY long month.

First off, I just want to tell you, Citrus Lane has pretty much the best customer service ever. A few of my items arrived damaged (well, the popcorn bag kind of… popped… in transit, and stuck to some of the other items). I tweeted Citrus Lane and they solved the matter ASAP– on a holiday weekend, no less! It seems the lovely people at Citrus Lane never rest until all of their customers are happy!

If you’ve read my posts reviewing the boxes before, some of this is going to be a touch of the same, but I’ve found google sends a lot of people my way who haven’t read my review posts before, and so I just want to tell everyone this: getting a Citrus Lane box is like literally receiving a box of sunshine on your front porch. I’m not kidding.

The box is brown with a yellow stripe saying “Citrus Lane,” (because, I mean, what else would it say?) and as soon as you open it, there’s bright, sunshiny, yellow tissue paper. This was the first item Z headed for. He grabbed it, waving it around like a flag, crinkling it up, tossing it around. He thought that paper was the coolest thing ever.

While Zach explored the paper, I got into the stuff inside the box. Here’s what came with it.


P’kolino Fishing Hole Size Sorter, $24.99

This sorter is really cute. It comes with the actual aquarium part, and 6 fish (2 of each size). The fish are painted to correspond with the slot they fit in on the top- the blue fish can fit in the blue slot, etc. Because the toys are made of natural wood and non-toxic water-based finish, it’s okay for Zach to gum the living daylights out of the fish without worry that he’ll get sick or have some sort of gross stuff enter his system. Right now, Zach likes to gum the fish, or to pull the fish out of the open back on the sorter. I imagine when he gets older, he’ll learn more about sorting by color and size, but for now, he is able to enjoy it. I like that it’s a toy that will grow up with him, giving him options for play right away, and options for play in the future. I also like knowing that it’s safe for him to gum, because he’s at the age where everything goes in the mouth first. This is definitely a hit in our book- 5 stars!

P’kolino also provided a 15% off code for Citrus Lane subscribers, which I’m certain I’ll be using to get another fun item for Zach (I’m eyeing their multi-solution puzzles for when Zach gets older).

Baby Bug February Issue, $33.95 for 1 year subscription (Making this issue about $2.83).

Baby Bug magazine is a book-like magazine with bright illustrations and songs and rhymes to read together. Essentially, it’s like a story book in the mail each month, sometimes with some various shorter stories and poems in it. It’s cute, and it’s printed with non-toxic ink (and since Zach prefers chewing books instead of reading them, this is a plus), but it’s not really sturdy enough that we can read it without him trying to tear pages. Zach is going through a phase where he loves to tear and crinkle paper… which means unless it’s board book thickness, it won’t hold up unless he’s too sleepy to grab at pages. The magazine is cute, and I’m sure we’ll read this issue over and over… but I don’t see us subscribing to this. My only reason is this… I can spend $33.95 for a year of this magazine, which is cute, or I can spend that money on books for a year, that Zach and I have picked out to fit our own desires and needs (board vs. paper, etc). To me, at this age, I’d rather buy the books I know we’ll read for years to come, than for us to get a magazine. Perhaps it’s coming from my personal bias against magazines at the moment (since pinterest came along, all of my magazine subscriptions have gone by the wayside… in fact, the few that still arrive in the mail are instantly thrown into the art bin). To me, I just don’t know that the subscription would be worth it to us.

For those who would feel like the subscription would fit their family, there was also an offer code for $9 off of a year subscription in the box.

You Are My Little Bird CD by Elizabeth Mitchell, $12.00

This was a really good CD. It’s peppy, but still calming. I love that there’s a lot of action in the songs, but also a calm vibe to it. It’s very folksy, which is nice. I’ve been railing against CDs like Kidz Bop for years, because I feel like, morally, they aren’t the best choice for kids, and musically, they really aren’t, either. I like introducing adult music to Zach, but I like it to be child-friendly. This CD is all of that- it’s kid-friendly, but it has ACTUAL music, and in my opinion, it’s perfect. I don’t buy CDs often, and in fact, we had to slip it into a DVD player to listen to it because we don’t use a ton of CDs. I typically put things on Spotify or something. However, this CD is making the trip out to the car- my low-tech space- because it is devoid of all the hi-tech satellite radio stuff and instead, it’s become my CD haven. I think this CD will definitely be traveling many miles with us!

Petite Lemon Art Print, $24.95 for 16×9 personalized print (Box contained 8×10 non-personalized print)

This is an adorable alphabet print. I absolutely love it. Petite Lemon has some really fun personalized art prints that really make a room brighter, and they have all different themes for boys and girls. They’re modern and funky, but still classic. They don’t just sell art prints, either- they also have wall decals and growth charts! I think the print is cute, and will look great framed in our reading area, or possibly in our guest bathroom when that gets re-done. I love the print!

There is also a code for $10 off of a $40 purchase in the box, which will be really nice for getting some more cute decor!

479 Popcorn in Fleur de Sel Caramel, $1.99

I’ve saved the best for last. I mean, yes, the toy is awesome, and a lot longer lasting, but this gift that is just for mom, well… it’s perfect. I am being honest. I did the polite thing and shared a piece with my mom and brother. Really, just one piece for each of them. That was about all I could bear to part with because oh my gosh. This stuff was awesome. See, the 479 popcorn is coated with caramel, and a little bit of sea salt. The sea salt brought out the sweetness of the caramel. It was… wow. I mean, the popcorn may have literally been the best thing I’ve ever eaten, ever. The pouch was only 100 calories, but it was far more generous than the 100 calorie packs I’m used to. The popcorn actually made for a pretty filling snack (as compared to other 100 calorie packs where you get like… 2 cookies). I’ll definitely be ordering more popcorn from this brand in the future. I’m especially wanting to try their popcorn featuring truffle oil!


In addition to the great items included in the box, the booklet that talks about what each product is also talks about how babies learn through play- by touching, hearing, smelling and tasting, and seeing. It gives you key phrases to connect with your child by talking about the colors or textures they’re experiencing, for example.

The booklet also offers some ideas on music for kids that still keeps parents happy (instead of listing to the clean up song from Barney ad nauseum). They suggest fun musicians like They Might Be Giants, which offer great songs for kids that are entertaining for adults, too.

All in all, this is yet another box that I give 5 stars. I think the box contained a lot of AWESOME things- and they were more than enough to make up for things like the Baby Bug magazine, which didn’t fit our family, but I’m sure many other parents loved. As you can see by the prices on the items included, you can tell the value was again FAR over $25.00, and since you get free shipping, you’re really getting a good bang for your buck.

(Plus, how cute are these pictures? You know you want some pretty yellow paper photos of your own!)

The bottom line on Citrus Lane is this: I could easily go and spend my $25 on things for Zach and I. However, I prefer Citrus Lane for very specific reasons:

  1. I get more bang for my buck. Obviously, what they send me is valued at a much higher price than the $25 I’m spending.
  2. They curate the goods so I don’t have to. They specifically find brands that I may not be familiar with… Citrus Lane introduced me to Skip Hop, and now it’s one of my favorite brands. P’kolino is rapidly becoming another brand I love. I’d never purchased Stella and Dot jewelry before my first box, but now I know that I love their jewelry.
  3. They tailor it to my child’s age. This month, Zach received the P’kolino sorter because it was age appropriate for him. Other ages got a stacking sorter or a cutting foods set, because it’s age appropriate for them. The items in the box vary based on what your child’s age needs that month- and I love that. I love that the boxes will grow with him. A 3 year old’s needs for play are very different than a 7 month old’s. I love that Citrus Lane tailors it to our needs at the age he’s at.
  4. It comes in the mail… and it’s not a bill! Seriously, though. How often do you open your mailbox to see something fun and exciting? When is the last time you were mailed a fun gift? If you’re like me, your mailbox is stuffed with those little white envelopes asking for money, but it’s highly unlikely you’re getting something that is totally fun, totally exciting, and totally cool for you and your child to dive into together! Citrus Lane brings that… it’s WAY better than a bill. Trust me.
  5. They have awesome customer service. Like I said before, they solved my problem. On a weekend. A HOLIDAY weekend. That’s pretty awesome.
  6. They have a pretty cool blog, and lots of fun contests. Who wouldn’t want to participate and support such a FUN company?
  7. Citrus Lane makes me feel like the hippest, most on top of it mom ever. Seriously. I always have the newest, the coolest, the latest goodies for me and my child. I’m not kidding. Subscribing to Citrus Lane has made me a bit of a go-to person amongst my friends with kids when it comes to mommy or baby needs. I was the first to have the adorable Zutano clothing (hat featured in the December box) and the Dolphin Organics and Episencial lotions in my friend group. Zach’s toys (like his tugboat from GreenToys and his Fishing Hole sorter from P’kolino) make him the envy of playgroup. I never thought that I’d be able to afford this stuff as a single mom, but instead of budgeting for each and every item, I just make sure I have $25 to spare in my budget each month for Citrus Lane. That’s it- no shipping, no hidden costs, nothing. It’s actually something I can afford, and it keeps me on top of the latest trendy items for both Z and myself. That to me, is totally worth it.

Trust me, I’ve looked around. I’ve tried finding a better deal than this. There isn’t one.

Have I sold you on Citrus Lane yet? Cool. Here’s my referral link so you can go sign up, too. http://www.citruslane.com/invitedby/Jennifer.Schoenberger and, if you use the code CITRUSFRESH, it’ll give you $10 off your first month (or any multi-month package).

Gettin’ Crafty: Heart Chain

I am what my mother refers to as a “Holiday Junkie.” When a holiday comes close, she does everything she can to pull me away from Pinterest and hide my scissors and glue, because I go all. flippin. out. For Christmas, I did two advent chains- one with scriptures telling the story of Christmas each night, verse by verse, throughout various books of the Bible, and the other including activities that our family could do together, like dancing to Christmas music in the dark (only Christmas lights were on!) and making snowmen pancakes and Christmas tree waffles.

For Valentine’s Day, we decided to add to our paper snowflakes hanging from the ceiling by cutting out pink paper hearts. Zach loves to sit in the sunroom and watch the hearts and snowflakes twirl as the air current from the heater hits them.

I got another great idea for a craft, though, from one of my favorite blogs. Those of you who read my frequent reviews of Citrus Lane (LOVE them!) probably know I’m a huge addict when it comes to their blog, as well.

They posted a really cool craft in conjunction with Petite Lemon. And, all you need is a stapler, some strips of paper, and some scissors! (Well, and a printer helps, too). There’s virtually no cleanup involved!

Image Linked to Citrus Lane's Original Post

Now, isn’t that adorable? You see why I absolutely had to do that craft, right? Especially because I love crafts, and I love holidays, and, well, you know how it is.

Even better, the cute papers included in the craft are on the Petite Lemon blog, FREE! I love the cute patterns that Petite Lemon has- truly inspired printables!

Image linked to the Petite Lemon blog post.

Petite Lemon printed theirs on cardstock, but we opted to print ours on plain printer paper. Either would work, honestly, as long as it’s foldable and flexible!

Petite Lemon’s patterns are SO cute, but for my craft, I decided to choose some patterns that fit our house a little bit closer… so I used a retired kit from Sweet Shoppe Designs, called When You Need a Friend. Sweet Shoppe Designs is an amazing site- if you’re a digital scrapbooker or use any digital and paper elements, this is a very high quality site. It’s one of two sites that I visit in digiland to get my supplies.

Anyway, back to the tutorial. I selected five papers from that kit of varying patterns and colors that I felt complimented each other. I used photoshop to crop the 12×12 papers down to 8.5×11 papers, and printed them out.

Then, I recruited Jeffrey and mom to cut the papers into strips, about an inch wide, so I had 5 pages of about 11 strips, that were 1×8.5.

Once the strips were cut, we folded each colorful strip in half, so it makes a point. Then, for the first heart, you gently turn the strips into the center, towards the point, so that way the patterned sides touch each other. I tried several times to get a good picture of this, but honestly, in our kitchen, there isn’t a ton of great light, so I just didn’t get a shot of it. If you head over to the tutorials I linked you to, they can give you a visual for this step!

Pick up another folded strip, and slip it onto the heart. Then, repeat the stapling process again, and BAM! Another heart. Do this again and again and you’ll eventually have a chain of hearts.

We tried to alternate our patterened papers in a sort of organized chaos- we didn’t want two of the same pattern together, but we also didn’t want the patterned papers to go in the same order every time. I just tried to randomly shuffle the patterns in.

And voila! It’s a chain! 55 links was too long for our large opening between our sunroom and kitchen, so we split the links between that opening and our big window opening between the office and kitchen… hearts everywhere!

I snapped a quick shot so you could see it in our home… I’m seriously hoping we can redecorate soon and get some better lighting! Yikes! It seems no matter how I adjust my camera, the lighting is still just… blah.

Anyway, that’s my quick and easy craft for today. If you can wield scissors and a stapler without inflicting too much damage, you can totally do it! Let the uncrafty among us rejoice!

Plus, you can totally use whatever papers you want to. You can head over to Petite Lemon and print theirs off. You can select a digital kit that matches your home or the season and print out papers from that. You can check your paper stash and see if anything is calling to you. Heck, you could take plain white paper and let your child draw and color all over it, then cut it into strips and hang it up that way.


Special thanks to Citrus Lane and Petite Lemon for the amazing project inspiration, and to Sweet Shoppe Designs!


On Healthy Lunches for Little Tummies

How do you plan a lunch for a one year old? What's a suitable snack for an 18 month old? These healthy lunch ideas for the littlest tummies make food planning for babies just past the baby food stage easy!

Once a child outgrows the baby food stage, it can be tough deciding what to feed them. With my own son, I try to make sure he’s eating a great, balanced diet. Mind you, he enjoys pizza crusts and chocolate pudding, so he gets a bit of “junk food” from time to time, but I’ve found a few ideas and tips to keep food as healthy as possible.

Those who know me know that his purees have all been homemade. I understand why families choose to use Gerber and Beech Nut foods- I truly do. However, when I was pregnant with Zach, I made the decision that the best choice for our family was to have homemade purees. I hope that no one takes offense to the fact that I am a very homemade-feeder, because I’m not condemning anyone who chooses to feed their children store-bought foods! In fact, I give Zach some storebought foods (my favorites are Plum Organics, Ella’s Kitchen, and HappyBabyFood).

It’s really easy to think about healthy eating for adults- we all know how to read a Food Pyramid (well, I guess now it’s a “food plate,” but, I grew up in the Food Pyramid years and I don’t adapt to change well!) We also know that eating a variety of colors is good for us…

Red food helps provide lycopene, which is excellent at fighting heart disease. Greens are typically very high in fiber, and they provide antioxidants that help vision. Blues and Purples have phytonutrients that help promote healthy brain functions. Yellow and orange foods help boost the immune system with protective antioxidants.

The same principles are true for children- it’s important for them to eat a variety of foods in a variety of colors. Giving babies solid foods (after the doctor has approved it, of course) also helps them to stay fuller longer, which I personally have found means that Zach isn’t waking up as much because he stays fuller overnight.

I’m not a nutritionist or a doctor- I’m a mom- so please take what I have to say with a grain of salt (and always pass information through your doctor to find out his/her specific recommendations).

These are just my tried and true tips for helping your tot get plenty of different colors and food groups in a day.

Zach’s primary source of food is breastmilk. It provides the essential nutrients he needs, as well as providing plenty of things to boost his eyesight, his brain function, and more. In order to make sure he is getting plenty of healthy nutrients in his breastmilk, it’s important that I pay attention, first and foremost, to what I eat. Because this doesn’t always happen, his second line of defense is to make sure what he eats is a good healthy mix of foods. When I feed him, I try to make sure that his meals have an inviting presentation… even if he destroys my “food art” the second he sits down, it helps him see all of the fun colors and textures I’ve provided for him. Additionally, I’m not afraid of “messy” foods- I just try to plan messy foods near bathtime (so, most of the time, the messy stuff is served for dinner instead of lunch).

Messy play helps to encourage creativity, while stimulating the brain and boosting confidence. I know it seems odd that all of those things can be tied in together, but they are!

In order to show you how I serve Zach a variety of foods, here’s an example meal plan for him.

Breakfast

Single-grain cereal (oatmeal) mixed with fruit puree (homemade- bananas, peaches, apples, blueberries, a mixture, etc) and yogurt (plain or vanilla- NO HONEY!)

Lunch

String cheese (1/2 a piece, typically, torn into long strips that he can easily pick up himself), 1 piece whole grain or whole wheat toast (cut into triangles, no crusts) spread with fruit puree (organic pouch or homemade- I try to alternate between vegetables and fruits, or do half and half- he particularly likes sweet potatoes, the PlumOrganics Peach MishMash, bananas, or apple-blueberry blends), a few yogurt bites (we like HappyBaby Yogis), some cheese puffs (we like HappyBaby Organic Carrot and Cheese or Broccoli and Cheese puffs), some fruit puffs (we like PlumOrganics Superpuffs- I vary his colors every day over a week, or mix a few colors together at lunchtime), and a few sweet potato fries.

Dinner

Sometimes he’ll eat a pre-meal of some sweet potato fries, since he sometimes gets hungrier while dinner is cooking. Typically, he eats what we’re eating- if it’s spaghetti night, he may have a piece of toast spread with some homemade spaghetti sauce, some ground beef, and some mozzarella string cheese. If it’s pot roast, he’ll usually have some potatoes and carrots, and some roast that I’ve shredded. On homemade chicken and noodles night, he gets some noodles, some veggies, and some chicken from the soup. At dinner, I try to encourage him to drink from a cup, so I also give him some breastmilk in a cup- he has my help drinking it.

Dessert

Zach is a huge fan of desserts, but whenever I can, I try to keep it healthy. One of his favorite things is to eat “ice cream.” I have a Yonanas maker, which is an amazing machine that you feed frozen bananas (as well as other fruits, if desired), and out shoots something the consistency of soft serve. There are no other ingredients like milk or sugar- it’s literally JUST bananas (and any other additives you elect to add- sometimes we’ll toss in blueberries, dark chocolate, or frozen peaches or mangos). He is getting fresh fruit, but he feels like he’s getting an amazing ice cream treat.

Another recipe we’re fond of is ABC Pudding… you take one avocado, four bananas, and 1/4 cup of cocoa powder, and blend it in a blender (if the taste isn’t up your alley, adding a little sugar can help, but I try to keep it as low-sugar as possible for Zach). It’s important after blending to refrigerate it for at least one hour- this lets the pudding flavors blend. Avocados provide essential fats that babies need. Don’t worry about baby foods containing fats- babies need it for proper growth and development! Avocados provide a GOOD kind of fat that is healthy for baby (and for mommy, too). Sometimes, with the ABC Pudding, I’ll mix a little of his cereal in- it adds some texture while also adding some grains if he hasn’t had as many during a particular day.

Snacks

We typically stick to fresh or frozen fruit pieces, sweet potato fries (homemade), and HappyBaby Yogis or some Puffs (fruit, vegetable, or cheese-vegetable) from HappyBaby or Plum Organics.

So, in one day, Zach is getting multiple colors, a good mix of dairy, protein, fruits, vegetables, and grains. He’s also getting breastmilk several times a day (morning nap, afternoon nap, served in a cup with dinner, evening nap, before bed, and once during the night) on demand- if he wants to eat, he eats, and he chooses when he’s going to have breastmilk. I leave that very much up to him (if I pick him up and he’s trying to lift my shirt or grabbing at me, I know he definitely wants breast milk. When he is trying to push it away when I offer it, I know that’s not what he’s looking for). Breastfeeding on demand means he’s getting what he needs, and he is the final deciding factor in when he has breastmilk, and when he doesn’t.

Zach is good about showing when he’s full, and by allowing him to feed himself for several of his meals, he’s able to make it clear when he wants to eat, and when he doesn’t. When he stops feeding himself, he is typically done with his meal. I still try to make sure I’m helping him eat his breakfast, but I think it’s important to encourage him to spoon feed by giving him his own spoon to eat with- we both have spoons. I’ve also found that this eliminates him grabbing the spoon I’m trying to feed him with, which was a sticking point for our previous meals.

As for messy eating, I put a spoonful of pudding on his plate or tray, and he goes to town with a spoon and his fingers. If it ends up on his eyebrows and his ears instead of in his mouth, that’s okay. If it gets spread around the entire tray and he does a finger-painting method, that’s okay. It’s all washable. His clothes, his body, his tray… they can all be cleaned. I want him to get enjoyment out of what he is doing, express his creativity, and be encouraged in that. He learns that pudding tastes a lot better in the mouth than on his eyebrows because he tries putting it both places and experiences that.

Mealtime can help nutrition and self esteem. When I see he is doing a good job with eating, I encourage him by saying “Good job, Zach! You’re eating all of your colors!” We talk about the different colors and textures he gets. “Is that puff crunchy? Yummy!” “That pudding is squishy, isn’t it? I bet that feels funny in your fingers!” “Look- you’ve got purple, red, and green on your tray!” (Point to the colors as you say them). The more words you introduce to describe what he’s eating, the more he’ll learn different terms for those things as well.

I’m not going to say that I’m a perfect parent- there are many days when healthy eating goes out the window. I’m not above sitting my son down with a bag of Cheerios (oddly, he doesn’t care for them) or a little bit of chocolate pudding. I’ve fed him conventional ice cream from my favorite ice cream shoppe before. It’s not the end of the world for him to experience those things, too. But I’ve found the more I encourage him to eat healthy, the more he takes on a preference to that. My son tends to turn his nose up when I’ve given him Gerber (on the go, in an emergency)- it’s just not his preference after having the homemade.

Here are some ideas of what sorts of foods to feed your tot. Make sure what they have is soft enough for them to eat, and able to be chewed reasonably easily.

Dairy String Cheese, Yogurt, Freeze dried yogurt, Puddings made from milk

Protein String cheese, yogurt, meat purees, small chunks of meat

Grains Whole wheat or whole grain bread, strips of tortilla, barley, oatmeal, rice, puffs made for babies, Cheerios

Fats Avocado

Vegetables and Fruits Sweet potatoes (orange), bananas (yellow), smashed or pureed peas (green), green beans (green), pureed or steamed apples, beets (purple), smashed or pureed blueberries (purple), peppers (yellows, oranges, reds), peaches, pears, Puffs made for babies that include fruits and veggies (added into a diet sparingly).

There are plenty of choices for kids to eat, so use your imagination. Make sure you choose items that are easy to gum. If anything is a choking hazard (peas, grapes, etc), make sure you either smash them or puree them, so your child doesn’t choke.

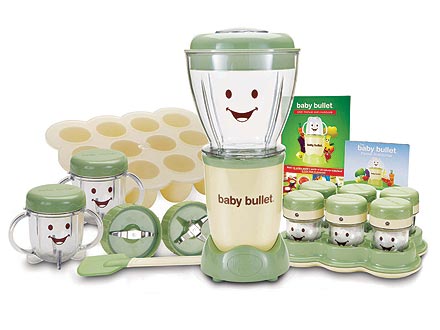
Finally, below is my absolute favorite way to make Zach’s baby food. I’ve found that this works well for purees for him (but I’ve also used it for smoothies for me, or to make salsas and more!) It’s a true multi-purpose kitchen gadget, and the storage cannot be beat- the silicone tray is perfect for freezing a lot of different baby food purees, and now that Zach doesn’t eat as many purees, it’s good for freezing little mini pudding pops for Zach, which are super soothing on his gums! I can’t live without this! (Image linked again)

Ultimately, you have to choose the right foods for your child, but a lot of it is about mixing and matching, and building meals around what your child likes. Just remember the simple principles- Remember your food pyramid, and make sure your child is getting a rainbow of colors!

How I Give My Son Cool Gifts… Without Breaking the Bank

How do you give kids cool gifts without breaking the bank? These tips will help you, no matter who you're buying for!I have a 7 month old, and I know it’s kind of cheating, but he is SO easy to shop for. The nice thing about young children is you can predict their interests pretty easily. This makes gift giving super cheap (and so much fun!)

It’s also no secret that I’m a single mom. Money is tight… because I’m disabled, my sole source of income is barely enough to support us. But that doesn’t stop me from giving my son amazing gifts for holidays. I just have to find ways around the price tags! (And the best part is, these secrets apply whether your child is 7 months old or 7 years old!)

Here’s how I do it:

1) Garage Sales Are Your Friend

At this age, my son has no idea if I paid $1 or $15 for that cool xylophone he got for Valentine’s day. All he knows is, it makes noise, and it’s a lot of fun. I check garage sales frequently for age-appropriate toys with no damage. My son has no idea it’s secondhand, but even if he did know, I don’t think it would stop him from having a blast. Most of what he owns is secondhand. One of his favorite toys is a toy laptop that was given to me by a family whose children had outgrown it. The original price? $31.99. I have a motorized car in the basement that Zach is going to get in about a year and a half. It originally cost over $70. I paid $6 for it. It works perfectly. Seriously, embrace the secondhand. Consignment sales, garage sales, they get you a lot of cool toys, for a really good price! Even with older kids, if you’re able to find toys in like-new condition, the packaging won’t matter. Looking for electronics? Shop refurbished items, which are often like new or used previously by individuals who took VERY good care of it. No one will ever know the difference.

2) Scour sales online and in store

I keep an eye out for toy sales as often as I can. Last year, someone clued me in to a supersale on Melissa and Doug wooden toys from Bloomingdales. The original price of the toys were $20-$30 each… I shelled out a mere $4-6 per toy, and searched for a free shipping code from retailmenot.com. I purchased got toys for 4 holidays, for $22. Last year, I found a great deal on Melissa and Doug puzzles, in store this time, at Toys R Us. The puzzles typically were in the $15 range, and I spent $5 each on them, plus used a coupon to save even more. Unexpected sales are a great source of savings, especially if you know when and what to look for (and make sure to stay within a set budget!)

3) Seasonal Items are total steals!

My son loves books. He loves to read them, chew on them, and savor each page. Since it was the day after Valentine’s Day today, I ventured to my local Walmart. They had all Valentine’s merchandise marked down… including seasonal books. I was able to get some fun books for Zach, half off. I purchased 3 books (priced $2-8 each) and spent $6. These books will stay in the closet and make an appearance next year. Since he’s so young, he isn’t suddenly going to jump a huge amount of reading levels, obviously, so I can get away with purchasing books and sticking them in a closet until next year. I also looked for other seasonal toys or outfits- if you can judge what your child’s size might be, you can even buy some seasonal clothing early (or buy clothing that looks seasonal, but could be worn even after the holiday- today I picked up some socks that said “Future Mr. Right.” They were red and black, and from a Valentine’s collection, but said nothing about first V-day or anything… that’s a pair that can be worn anytime! I also found 2 Valentine’s-themed lidded mixing bowls at Target, which were $6.88 total. These will go into “his cabinet” of kitchen goodies he can play in… it cost me very little, but will provide hours of fun. He can use them as drums, hide things in them, and, as he grows older, we can use them as small sensory bins or even cook using them. They’re pretty heavy duty.

4) Look for things that grow or have multiple uses

I’ll repeat the example of the mixing bowls above. Right now, my son is in a banging phase. He bangs on everything- the floor, the table, anything. Those lidded mixing bowls are not bowls, but instead, they’re a drumset. In a year, they’ll be storage containers for edible play dough. A year after that, they’ll grow into a sensory tub. After that, we’ll be able to use those bowls to mix up a cake or some bread. Each year, or even from month-to-month, those bowls will have varying uses that will grow with him over time. In the Melissa and Doug toys I scored, Zach loves a tambourine that came with it. Again, it’s something he can bang on. But that tambourine came as part of a set, and I can guarantee that a year from now, the cymbals or triangle will get a lot of use, even though right now, they just sit in his toybox, untouched. Things that grow with your child are worth an extra look. That bathtub with the sprayer may look cool, but you might consider the bathtub that comes with a sink sling and a base that transforms into a step stool… not only did my son use that bath sling all the time when he was first born, and now uses the tub without the sling, but he’ll also use the step stool in a couple of years when we’re potty training. When you pick an item that can be used in different ways or at different stages, you’re picking an item that stretches your dollar over the long run. Also consider this idea when buying things like Lego sets. Lego sells some sets that are 3-in-1 for the same price as other sets that only have one way to build (well, obviously Lego sets have a million ways to build, but one set of instructions comes with it). If your child is very into the building and rebuilding, a 3-in-1 set is probably more worth your money than a set that will be built once and put away.

5) Space out your giving

Last month, I got my Citrus Lane box in the mail. You have seen me blog about this before and post my reviews, but here’s the deal. When I get the box, I give it a good, careful look. Last month, Zach immediately got to play with the tugboat. It was a “right now” gift. But I held onto the strawberry yogurt snacks. I didn’t open them, I didn’t really draw attention to them. They went into the closet. Zach “nommed” on the mango snacks, yes, and loved them. So, as part of his Valentine’s day gift, he got the adorable pink Strawberry Yogurt snacks. For now, he’s more interested in the unwrapping than what’s inside, so he doesn’t care that I gave him some yogurt snacks… and even so, he LOVES yogurt snacks, so it wasn’t an issue (p.s., they were freeze dried, and totally closet-approved!). Maybe I won’t be able to get by with packaging up yogurt snacks in the future, but for now, it works for me, and that’s how I give him a cool gift. Right now, he loves the tambourine and maracas from his Melissa and Doug instruments, but when he gets bored with those, I can take those out of his main toy box, and swap his cymbals into the toy box, and he’ll have an all-new toy to play with. If you get a subscription box for your child, whether it’s Citrus Lane, LootCrate, or another great leader, try opening it separately, giving them something for now, and saving another gift for later. When stores like Target or Toys R Us do a Buy 2, Get 1 Free deal, consider giving one now, one for the next holiday, and one for the holiday after that!

6) Use Free Gift Cards to Stretch Your Budget

How many times do you see a deal where you can get a gift card at Target for buying a certain number of other items you’re buying anyway? While of course, they’re roping you into buying multiple items, if you plan on using the toilet paper or diapers or whatever else is in the deal, you may as well stock up, and save that gift card for when it’s gift-giving time! I’ll often purchase the items, then hold onto that gift card until Christmastime, getting many of my gifts free or very affordably. Additionally, Walmart now has the SavingsCatcher part of their app where you can get a gift card for the difference between what you paid at Walmart and what you could have paid at another local store instead if Walmart didn’t have the lowest price. These gift cards can be looked at as money set aside for helping you pay for a gift later.

7) Set a budget. Stick with it.

I know that I only make a certain amount in a year. That’s why I plan my spending out. Do I need to buy gifts for holidays? Cool, there’s an envelope for that. I have one envelope that, each month, I take money out, and put in there. That’s my holiday shopping for the month- be it Christmas, Birthday, Easter, whatever. That’s the money I have for it. That’s the money I can afford, and I’m not going over that. Do I need $450 for our annual island vacation? Yes. That’s a planned expense. I spend the entire year setting aside $20 here and $50 here, and by the time vacation rolls around, I have enough to pay for vacation. When I get home, I have an empty envelope to start over again. When you plan an expense, when you say “this is how much money I need for this,” then you know that you have to save that much money, and you do it. When I set a goal of what I’m spending my money on, what I need to save for, then it helps to work hard to reach that goal.

8) Teach him it’s not about the “get.”

Growing up, as Christmas would approach, my brother would get increasingly excited. I don’t presume that’s abnormal- most kids get excited as a holiday approaches. But when we’d inquire about his excitement, the answer was always the same “I can’t wait for you to open what I got you!” His joy, his Christmas excitement, didn’t come from finding out what we got him… it was seeing our face when we opened the gift he gave US. He is still that way. This year, he purchased a Valentine’s Day present for Zach. As soon as we woke up Valentine’s morning, he said “I think we should exchange gifts now.” “Now? Are you that excited to see what you got?” “No. I want Zach to open my present!” It’s just a part of our family- we all are like that. I am so happy to have grown up in a family that instilled a nature of giving. That’s something to pass on to my son… and that, I think, will help keep me from breaking the bank the most. It’s about teaching him that it’s not about the material objects. It’s about the family, and the love you share, that gets you through the year.

Happy (belated) Valentine’s Day, everyone!

A Gooey Trip to Chip’s Chocolate Factory

As most people following my blog know by now, Jeffrey is in the middle of a homeschooling unit all about chocolate. We’ve been working it into his math, science, writing, reading, and social studies, and trust me, it’s a sweet topic! When we first started gearing up to do this study, it was important for us to schedule a few field trips to really reinforce what we’ve been learning. One of those great field trips was a chance to head to Chip’s Chocolate Factory and watch the demonstration.

When we first emailed Chip’s about setting up an appointment, the owner, Mike, was very accommodating. He helped us plan our visit, and gave us an idea of what to expect. We decided that to get a nice-sized group, we would open the field trip up to other homeschooled students in our area. We found 12 other students that were interested in attending our sweet day!

Some people may be aware of Chip’s if they live in the Kansas City area. After all, it’s the home of Kansas City Fudge, and has been a part of crown center’s second level since 1983.


If you aren’t from the area, or don’t spend a lot of time up at Crown Center, you may also know Chip’s Chocolate Factory from an episode of Food Network’s “Kid in a Candy Store.”

I couldn’t find a clip from the episode, but I did find this great Crown Center video from youtube, all about Chip’s!

[youtube=http://www.youtube.com/watch?v=AJKsrOQhT4I]

Chip’s is committed to making all of their fudge by hand, and it isn’t introduced to machine processing at all, start-to-finish. On the tour, we started out learning some facts about chocolate. For Jeffrey, a lot of it reinforced what he had learned over the first half of his unit, but some of it was new information to us, like the cost of certain items using chocolate!

During the demonstration, our host, Cliff, showed us examples of a cacao pod, as well as the seeds, nibs, chocolate liquor (which has no alcohol- it’s just puuuuuure chocolate), cocoa butter (used not only in chocolate, but also in suntan lotion and hand cream!), cocoa cake (which is not actually a cake, but really just the word for chocolate that has had all of the cocoa butter pressed out, so it becomes a thick cake- kind of like a large hockey puck, and gets dropped so it turns to powder), and semi-sweet chocolate.


While he was introducing these parts to us, molten chocolate was cooling on marble slabs. Why marble? Because it’s naturally cool, which helps cool the chocolate during fudge production!

Before our presentation started, they poured the chocolate onto the marble table out of a big copper kettle.

Finally, after the presentation, it was time to see if the chocolate cooled enough. Cliff pulled a small hand paddle through the fudge and checked the doneness by seeing how long it took for those holes to close in.

And, it’s finally ready! So he cut the bars off of the chocolate…

Time to paddle! Cliff was a great paddler, tossing the chocolate high into the air. Using this method whips all sorts of air into the chocolate, to make it creamy and fluffy, the perfect fudge!

The chocolate soared higher and higher, and he nearly missed the lights hanging from the ceiling. He quipped “Sometimes the chocolate hits the light. That’s how we make light chocolate…” It quickly preceded another joke, “We have fat free fudge here… you buy the fudge, and you get the fat FREE!” The humor was very engaging, and the kids were really interested in the fudge process.

Cliff tossed the chocolate even higher, doing fun tricks like catching it in his mouth. When it neared the ceiling, he said, “Look! Our quality is through the roof!”

He added “Don’t try this at home. Try this at your neighbor’s home. All the fun, none of the mess.”

A lot of people have been to the St. Louis Arch, but not many have seen the Kansas City Chocolate Arch. “They did a taste test between the two… ours won.”

As the fudge began to come together after more tossing, it was time for Cliff to show us all some things we could make at home, that would be far less messy than throwing fudge!

One easy recipe involved taking melted chocolate, and making chocolate “puddles” on a sheet of waxed paper, then sprinkling on some brightly colored sprinkles, or some M&Ms minis!

He also made several delicious recipes using graham crackers (Take a graham cracker, put a little melted chocolate on, then put a marshmallow on it, drizzle it with melted chocolate, and crumble up some more graham cracker on top), and something called “S’moreos.” This was a similar recipe requiring you to take an Oreo, twist it apart (I know, that could be painful for my readers who happen to be dunkers instead of twisters), and laying the half with the cream on the waxed paper (cream up). Drizzle that with chocolate, add half of a large marshmallow, drizzle it with more chocolate, and crumble the other half of the Oreo on top! Yum!

See those marshmallows in the center, with the chocolate and sprinkles? Those also include a very special ingredient, for brave souls only. I’ll be posting the recipe later this week, but here’s a hint as to what’s beneath that yummy chocolate…

Yes. Those are REAL food-grade crickets. Salt and Vinegar flavor. (The candy store in the lower level of Crown Center also sells Bacon and Cheese flavor, as well as Sour Cream and Onion. You know, if you like your crickets like you like your potato chips). One soul was brave enough to try the chocolate cricket goodness…

Mmm… crunchy!

The other kids stuck to less crunchy bug-related samples, by snacking on the other recipes he showed. With the extra melted chocolate, he drizzled it over the audiences tongues- no spoons required! Yum.

We also all got to sample plenty of fudge, at different stages of the fudge process… and I NEVER pass up free fudge!

Zach didn’t pass it up, either!

After that, nuts were added to the fudge, and it was almost ready to be put into a loaf! Cliff comes from a long line of “loafers.” Did you know when the fudge hits your shoe, it’s what’s called “Sole food?” Yeah, me neither… these jokes just keep getting better and better! Haha.


The trip to Chips was incredible. I think it really reinforced the principles that we had been learning about in the past month, and it also really helped show us some of the things we had seen photos or videos of, in an actual, physical item (like the pod). Our guide was nice, and incredibly funny, helping drive home the educational points in a fun way.

If you’re in Kansas City, I strongly encourage you to stop by Chip’s Chocolate Factory for a group tour (contact them in advance on their website at www.chipschocolatefactory.com) or visit them to buy some fudge! You can also find them on Facebook by looking for Chip’s Chocolate Factory, or on Twitter, @ChipsChcltFctry.

After our tour at Chip’s, we decided to head to Fritz’s for lunch.

If you’ve never been to Fritz’s, it’s a really unique restaurant that delivers food by train!

After Fritz’s, we enjoyed looking around. If you haven’t heard, Crown Center is expecting some new arrivals this spring… the Sea Life Aquarium and a LegoLand! For LegoLand, they have a statue of Legos in Crown Center’s main entrance, and Jeffrey decided to take a guess of how many Legos might be in the statue. The winner gets a family pack of tickets!


Then, the boys had some impromptu learning time, by throwing their Fritz’s hats over the air vents in the front entry of Crown Center. I really enjoyed watching them play and learn themselves. They experimented with placing the hats closer to the vents, and then just tossing them higher into the air stream. They also experimented with putting the hats upside down, right side up, or flattened out, to see if it would cause different flight patterns.

Zach mostly just sat there during the experiments…


We finished the day off with some smoothies, but Zach opted for some chocolate custard!

Special thanks to Chip’s Chocolate Factory for letting us bring our group for a visit! Don’t forget to check out their Facebook, Twitter, and Website!

Homeschooling: A Week In Review

It’s that time again, and it’s hard to believe we’ve now completed our first full official week of homeschooling! We did a lot of activities this week, as well as hitting the basics.

As I’ve mentioned in the past, we’ve chosen to write Jeffrey’s homeschool curriculum ourselves, using many resources from the internet, the library, and our own personal knowledge. We incorporate a lot of different methods, including the traditional (Math U See, Grammar books, etc) and the less traditional (learning fractions through baking, watching Good Eats and incorporating those ideas into science and math studies).

This week, we finished up reading Chocolate Fever, by Robert Kimmel Smith. It’s a book that really discusses moderation, in sorts. It’s a lighthearted story about a boy named Henry Green, who likes chocolate in EVERYTHING. Chocolate and pancakes? Yup. Chocolate and milk? Check. Chocolate and mashed potatoes? Totally. This kid is a choco-holic to the extreme, and one day, it kind of comes back to get him… he breaks out in little brown spots, in a case of CHOCOLATE FEVER! It’s a great book to teach kids about eating things in moderation, and how too much of a good thing can be a bad thing. It’s also a good book to discuss what to do when you’re afraid or nervous, or to discuss the effects of some foods on our bodies. It’s actually also a great book to read silently, or read before bed as a story together… the chapters are great bite-sized chunks. Definitely a good book for kids!

We also worked on a mini unit involving M&Ms. For our research skills, we learned that the company that makes M&Ms, Mars, also makes 3 Musketeers, Milky Way, all Wrigley and 5 gums, and even pet food! We also typed an email to Mars letting them know about our study of chocolate using M&Ms, as part of our typing practice.

M&Ms were a part of our study the entire week, and one of our fun projects involving M&Ms was a cool camouflage game! We took 10 of each color M&M- Red, Yellow, Orange, Green, Blue, and Brown, and poured them into a bowl with candy corn (which, we know are colored Orange, Yellow, and White).

Obviously, the Red, Green, Blue, and Brown M&Ms stand out a lot more than the Yellow and Orange! We didn’t tell Jeffrey what the plan was at all, or the lesson- we simply said “Pull out the first five M&Ms you see. Mark them on your graph, and toss them back in.” He did this, and each time would pull out the first five M&Ms. After 6 or 7 trials, we noticed that he had only pulled out 3 total orange or yellow, but over 40 total of the other colors! This was a great way to introduce that some animals and insects camouflage themselves to their surroundings by adopting the colors their surroundings, or sometimes even try to look like objects in their surroundings. We talked about chameleons, who change color to suit their surroundings, and Jeffrey brought up the examples of leaf bugs and stick bugs, whose bodies are very clear representations of their surroundings! It was a great discussion about how animals keep themselves from being hunted. Jeffrey also came up with examples like the arctic fox, who are white like the snow, and blend in with their surroundings. If Jeffrey were the hunter, and M&Ms were the prey, the yellow and orange did a pretty good job of protecting themselves!

Another science activity we played, using candy from the Mars company, was a Sink and Float game. Jeffrey considered the fillings of Milky Way, Milky Way Midnight, Snickers, Twix, M&Ms, and 3 Musketeers, and figured out whether they would sink, or float. Jeffrey hypothesized that 3 Musketeers would float because of the air filling (in the commercials, the bars are light and airy, and are shown to float even in the air, so it was a reasonable bet that, in water, the air trapped inside might make it float!) He believed that Milky Way and Milky Way Midnight would probably both sink- because the fillings are the same, if one sank, the other would, too. He thought that the heavy peanuts in Snickers could make it sink, but the light nougat could make it float, so he wasn’t sure how to hypothesize about the Snickers. The M&M, he thought, might float, because of it’s shape, and finally, he thought the cookie inside the Twix was light enough to make it float.

One by one, we dropped candies into the water.

Milky Way and Milky Way Midnight bot sank, just like Jeffrey thought. The 3 Musketeers floated, which he also accurately hypothesized. The nuts won out over nougat in the Snickers bar, because it sank like a rock, and even with it’s odd shape, the M&M sank, too. The Twix, though, that one made us laugh. Remember, Jeffrey thought it might float because of the light, airy shortbread cookie. Well, we dropped the Twix in, and it sank… but then it flipped over, so the cookie was on top! So, Jeffrey was kind of right- the cookie WAS airy enough to float, but the caramel and chocolate weighed it down.

We also incorporated M&Ms into a weights and measures activity, to practice using a balance for future science projects, and to talk about accuracy- sometimes, 24 M&Ms were too light, but 25 were too heavy, so it had to be somewhere in between the two measurements. We weighed M&Ms against many household objects, like a pencil, glue, tape, a cell phone, and a pair of scissors. We also figured out that if we knew how much one object weighed, and we added another object, we could take the total weight minus the weight of what we knew, to figure out the weight of the other object.

We discussed how, in ancient times, cacao beans were used as money in some parts of the world. One way that we ingrained this topic was by making monster cookies using M&Ms.

After we made the monster cookies, each of us dug into two of them, extracted the M&Ms, and used various equations to find out how much our cookies were worth based on our M&M “money.” It turned out that mom had the most valuable cookie, and I had the one with the least value… Jeffrey’s cookie was in between! Not only did we get a history lesson by discussing how currency around the world, and in different time periods, isn’t just like our money in America today, but we also worked on writing out a numeric equation based on a word or story problem, and we worked on measurements for cooking. A lot of the activities we do really incorporate several different subjects, to the point that sometimes it’s hard to say “This was our math lesson,” “this was our science lesson.” Many of our lessons are just that… “learning lessons.”

Some of our projects this week didn’t involve M&Ms at all, though. One of the particularly interesting topics we covered was based on part of the Field Museum’s curriculum regarding chocolate, which I found on their website. For this particular study, we discussed who grows chocolate, and how it affects their lives. We talked about the kind of life that the people who grow chocolate live, and how sometimes it can be a hard life. For example, we learned that many times, children younger than Jeffrey are recruited to work with the cacao trees and cut pods off of the trees, instead of going to school and studying. We also learned that sometimes, they don’t get paid much, but that some chocolate companies make sure that the people get paid fairly for their work, and give them ownership of the fields. Finally, we talked about what would happen if the world suddenly stopped eating chocolate (they would lose their jobs, and a lot of their lifestyle would be gone. Some of them could even have trouble affording food and shelter, and might die). We also talked about what would happen if the world suddenly started eating a lot more chocolate (they would have a lot more income, but also a lot more work to do. We would need more cacao trees, which also means we might have to cut down other trees to plant them).

We also discussed what basic needs people have, such as shelter, food, water, and clothing. To illustrate this, we gave Jeffrey the example that he would have to live in the park nearest our home. I asked him what he would do for food, clothing, and shelter. He mentioned that for food, he could always hunt squirrels or birds, fashioning arrows from sticks in the park. He also said that, since there are grills at the park, he could cook them on the grill using dried grass and stones to start the fire. He said that there were drinking fountains that would give him water, and a gazebo that could provide shelter from rain, or, he could rest at the top of the playground equipment, in a section that is covered and has the sides covered, as well. He carefully thought out important things like where he could use the restroom, and what clothing he might bring with him from home. He talked about how it was important to choose things that were cheap or free, and to choose things that were closely available. Obviously, if he was living in a park in Kansas, he would have to hunt squirrels, rather than polar bears. We talked about resource availability, and seeing what was closest to us.

We also discussed the Maya and the Aztec, and their connections to chocolate. They named it Theobroma Cacao, or, the Food of the Gods. They believed that their gods had left it here for them, and that they were to give it back to the gods when they returned to the earth. When the Spanish explorers came to their civilization, they believed that they were gods, and gave the chocolate to them, which later led to them bringing it back to Europe. We also discussed how chocolate was mostly for the wealthy, like the kings. I chose to skip the part about how, before a human sacrifice, the person being sacrificed would drink chocolate mixed with blood… ew! We also talked about how chocolate was almost always in liquid form during that time, and was consumed as a hot drink. We made our own Mayan Chocolate Drink, and determined that modern hot chocolate tasted MUCH better!

Jeffrey also spent some time researching the actual tree, and it’s growing conditions.

Did you know that monkeys are a big part of making sure we have plenty of cacao? They are one of the biggest spreaders and fertilizers of the cacao tree… a monkey will eat the cacao pods, digest them, and poop out cacao seeds, which later, can fertilize the seeds into a tree. Jeffrey liked to say this week that, when you eat a chocolate bar, you really should be thanking the monkeys for their poop.

We also learned that cacao trees would not produce their fruits without the help of a tiny little mosquito like insect, known as the midge. The midge is the sole pollinator of that species of trees, and without that midge there to pollinate it, the trees wouldn’t exist as we know them!

Another plus of homeschooling? Jeffrey is able to do all of this research in his pajamas and robe! He’s pretty happy about that…

We did have some beautiful weather at the beginning of the week, so we were able to spend some time playing outdoors.

And, for a little social time, Jeffrey was even able to jump into a one-time gymnastics class at a local gymnastics studio, which was a nice chance for some P.E.

We wrapped up the week with a little bit of review- by playing “Review Sorry!” In our house, one of the video games we all love is Sorry. We play it all the time, and it’s a big part of our lives. We adapted the game for review by saying that each person had to answer a review question correctly in order to draw a card and move their turn. The questions ranged from questions about the book we read this week, to requests to define vocabulary words, to working on describing objects in detail (we’re working on using descriptive words and expanding a single sentence into a more detailed paragraph). We also discussed facts, like the monkeys pooping out the seeds. Each week, we will take our old review questions, and add new ones in, and play a game, until, at the end of the unit, we have a whole flock of questions in our arsenal.

Homeschooling isn’t without it’s occasional tears or stress, but honestly, it’s one of the best decisions we’ve made for our family. We find that we are learning so many things, not just Jeffrey, but our entire family. As we’ve been going over math skills for Jeffrey, we’ve realized that mom and I are improving our math skills, as well. We really have worked together as a family to improve our minds, and we are all excited about what next week holds in our homeschooling adventure.

Oh, and for the record, Zach has school work to complete, too… see?

Have a good week, everyone!